The Obstacle Course
31st March
This blog will cover the layout of the obstacle course and the various processes I went through in order to successfully navigate the course using the Elegoo Robot. The robot should navigate the course and then collect as many ping pong balls as possible being launched from the Ping Pong Launcher. Here are the draft rules as of now:

** While most of my blogs are dated and follow a chronological order, given the nature of this blog that involves the programming and launching aspects, I’ve split the blog into two sections rather than regular dates, chopping and changing between two parts.
For more info on the launcher, check out my other blog here. It details the entire design process. This blog will consist of two main parts that I’ll be working on simultaneously. They are as follows;
Programming: This will involve scripting the code via Arduino that will allow the Arduino to navigate the course as seamlessly as possible. I’ll be explaining my code in detail, explaining any changes made as we progress
Launching: This will involve making adjustments to the launcher, the robot, or the course to facilitate the accuracy of the ping pong launcher
If all goes well, I’ll have a video of the robot navigating the course automatically and firing the three ping-pong balls into the bucket for collection. Stay tuned!
Without further ado, here’s the course we’ve been assigned below.

All the details on how I constructed the course can be found here. I won’t be spending much time in this blog on the actual course so be sure to check that out
The plane is to program the robot via Arduino to navigate the course, collect the balls and then exit to the left. Now as I discussed in my Assembly and Testing blog, the Robot has an integrated app and preloaded source. However, for this assignment, I’ll be uploading my own code to the Robot, having completed a lot of background work on Arduino in this module last semester.
I’m working on the launcher and attachment in parallel with this obstacle course so check out those blogs. In order to catch the ping pong balls being launched, I’ll need to create/obtain a basket of some sort. Check out my design upgrades blog here.
Coding — The Beginning

Here’s the initial pseudo-code for the robot navigating the maze, a lot of it will be based on the ultrasonic sensor. The code will be far more complicated, but it’s a good base to start from.
Coding — Pre-programmed: Tumbller Library

As I previously mentioned, the robot has many in-built functions that we can't use to navigate the course. It doesn’t mean that I can’t draw inspiration from it though. The tumbler code itself is fairly chaotic, far beyond my knowledge as a programmer. It incorporates libraries for Bluetooth, Self-balancing, and the Follow mode. I won’t need any of this. All I need to do is navigate the course.

As you can see above, there are so many complex libraries. The tumbler code itself is here if you want to check it out. Just scroll on down to resources and download the zip file. Anyway, the code is far too complex. So I’ve opted to pursue the simpler Lesson 1 (Moving Control) file. This is a way simpler aspect of the code that just focuses on just moving the motors. The motor.cpp library file encoded the motors to run backwards, forwards, left and right.

So I started off by just programming the motors to run specific times to turn around the track using the delay() function below:

It was really crude, and ugly programming. It operated off no sensors and took a massive amount of trial and error trying to time the motors to turn 90 degrees. It was still a good start that I managed to get the motors and code porting correctly to the Robot.
Coding — Ultrasonic Sensor
Luckily enough, I’ve coded an ultrasonic sensor before for a part of my Rube Goldberg machine. The tumbler code really complicates it. Here’s how I added mine

So I went into the Pins.H library given and found the trigger and echo pin labels and used them to define the pins 11 and A3. I then included the HC-SR04 (Ultrasensor Library) that was already pre-installed on the arduino standard libraries. This allowed me to avoid the complex code in the tumbler. I then just calculated the distance between obstacles at the beginning of the void loop as follows:

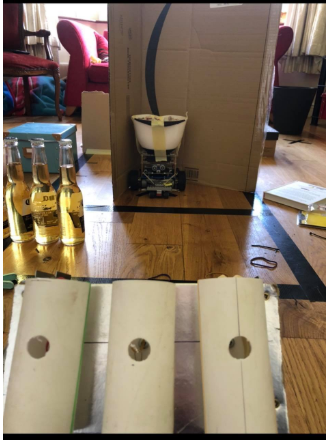
I’m using this code to calculate the distance to the obstacles. I also added two shoeboxes to the sides of my course to give the sensors something to work off. You can also spot that I added loads of bottles of beer for it to launch over. I’ve done this so the sensor will detect them a lot better than individually spaced bottles.

When the proximity to an obstacle is less than a certain amount, in my case I chose 9cm, the robot will either turn left or right. The left or right turn will depend on the state of the robot. I created a variable named ‘turns’ which kept track of the number of times the robot has turned left or right. For the final turn, I’ve written out a short function for straightening up the robot to land on the correct location for balls to be fired. But for the moment here’s my rough pseudo-code:

Coding — Turning Functions

I set the motor turning speed to 100. Through trial and error, I calculated that 1200 milliseconds rotates the Robot 90 Degrees is Speed is 100. I also wrote another function for when the robot is trying to get to the endzone. I call it to straighten up. It will activate on the 5th turn and when the distance is 25cm away from the obstacles.
Also I couldn’t figure out how to make the robot stop. My ingenious solution was to make the robot go forward but just set the speed = 0

All those timings were created through trial and error to try to hit the mark as accurately as possible. The more accurate the ‘landing of the robot’ the easier it would be to fire the balls into the bucket. Here’s my first successful attempt navigating the course with the code:
It works pretty well, although the code is a bit manual and inefficient. Our lecturer suggested incorporating switch statements. It would be a far more effective way of incorporating the turns aspect of the code. I might also have to make adjustments to the code once I add the bucket, which will affect the weight.

Basically, it works depending on what ‘state’ the robot is in, i.e. how many times it has turned? In the void setup I set turns=1;. When it turns left for the first time it will then add a turn (turn++). This makes turns =2; and so the next time the robot is within 9cm of an obstacle it will activate case 2; and so on… I also put in an else if statement for straightening up the robot afterward:

Here’s the new code in action:
Problem — Wheels Veering
So slight problem, The motors seem to have started to drift to the right! It’s very odd, I’ve made no adjustments to the code or anything regarding the motors. It might be something to do with the basket attachment and its weight distribution but I could be wrong. Well there’s nothing I can do except work around it.
Solution — Adjust Timings of Turns
Okay so I’ve a brilliant solution. Since it always veering right slightly that means:
1. It needs to turn left for a shorter period of time
2. It needs to turn right for a longer period of time
So I’ve adjusted the turnings of the timings by about 100 milliseconds depending on the type of turn. So 1300ms to turn right, and 1100ms to turn left.

Everything else worked perfectly after this! Below is a video of my final navigation of the obstacle course:
In the end, I used a forward-moving speed of 50 and a turning speed of 100. The distance from the walls was 9cm and the bottles were 25cm.
Well, that’s the coding aspect of this blog nailed so now it’s time to move on to the firing.
Coding — For the Video
To not get an awkward shot of me flicking the on switch then prancing around in my pyjamas to the launcher, I added a small delay of 5 seconds in the void setup.
Launching— Testing
I’ve detailed my ping pong blog launcher in another blog, so if you haven’t had a look at it make sure to check it out before continuing with this blog. As I stated previously, the prerequisites for the design were building an auto-reloading energy source and ping pong ball supply. I’ve gotten around this by incorporating multiple launchers with 3 firing pins. This satisfies these constraints.
Update: The height requirements have been relaxed. This doesn’t really affect me, all I need to is keep the ‘arc’ shot nature of the ping pong ball.
Trying to work on launcher accuracy was very boring and extremely tedious. It involved messing around with different types of elastic bands. e.g. smaller, weaker, stronger, longer bands. Each launcher was slightly different so I had to tweak them to aim into the middle of the course.
Adjustments — Angle of Elevation

When testing the launch, I realised that a greater initial launch angle would give the projectile path a better arc and allow for more accuracy. In a very engineering way, I shoved two books underneath. The thickness of these was about 4.5cm so that changes the angle of elevation to about 65 degrees. This seemed to work perfectly. Almost ready to start firing. This combined with my altered basket angle really works well, see more about that in the design upgrades blog. I also added the cloth to help absorb the energy to stop the ball from bouncing out.
Pre-Launch
Here’s the layout of the launch before I started.
Launch
Not much to be said about the launch, it took a few tries but I had fine-tuned the launcher’s elasticity so well at that stage so accuracy was great. Here’s the final video below:
Well, that’s all she wrote. I can finally give my sitting room back to my family. 3 Ping Pong balls ain't bad. Especially considering the multiple design iterations I went through. It navigated the course really well, it didn’t hit any of the obstacles. My code was pretty seamless and well written. I made great use of my household materials, hopefully, I can reuse some of these parts for my next project. Make sure to check out my Rube Goldberg blog that I’ll be working on for the next while…